Cycling fans are finding a cool way to make their bikes better with electric kits. A DIY e-bike conversion kit is a budget-friendly option instead of buying a new electric bike. It lets riders give their favorite bike a fresh start.
Electric bike kits are changing how we get around, making cycling more fun and affordable. With a DIY kit, you can turn a regular bike into a powerful electric one without spending a lot.
More and more people in the U.S. are turning their bikes into electric ones. They like the idea of making their bikes their own, saving the planet, and getting the electric boost without buying a new bike.
Whether you’re a city commuter or a weekend explorer, e-bike kits have something for everyone. They help you conquer tough hills, go further, or just make cycling easier and more fun.
Want to make your bike electric? This guide will show you how to pick and install the best DIY e-bike conversion kit for your bike.
Understanding E-bike Conversion Basics: What You Need to Know
Turning a regular bike into an electric one is exciting for cycling fans. A battery powered bike kit is a cheap way to make your bike electric. It lets you add the latest tech to your bike without buying a new one.
Getting into electric bike mods means knowing the key tech and parts. These are what make the conversion work well.
Types of Electric Bike Motors
There are two main types of electric bike motors:
- Hub Motors: Installed in wheel’s center
- Mid-Drive Motors: Positioned near bicycle’s pedal cranks
Essential Components Overview
Choosing the right parts is key for a good ebike conversion:
| Component | Function | Importance |
|---|---|---|
| Battery | Power source | Critical for range and performance |
| Controller | Manages electrical system | Regulates power delivery |
| Throttle | Speed control | Enables manual acceleration |
| Display | Information interface | Shows battery level, speed |
Power Requirements and Regulations
Before you start, check local e-bike laws. Most places have rules on motor power, speed, and electrical systems.
- Check local speed limits
- Verify motor wattage restrictions
- Understand bike classification rules
Knowing these basics helps you convert your bike legally and efficiently. It turns your regular bike into a fast electric ride.
DIY E-bike Conversion Kit: Complete Component Guide

Turning a regular bike into an electric one starts with knowing the essential parts of an electric bike motor kit. Each part is vital for a smooth and strong pedal assist kit. It changes how you ride.
The main parts of a typical e-bike conversion kit are:
- Electric Motor: The heart of your conversion, available in hub or mid-drive configurations
- Battery Pack: Provides power and determines your e-bike’s range
- Controller: Manages power distribution and motor performance
- Pedal Assist Sensor: Detects pedaling and activates motor support
- Wiring Harness: Connects all electrical components
- Display Unit: Shows speed, battery level, and assist modes
When picking an electric bike motor kit, make sure it fits your bike. Check if the parts match your bike’s frame, wheel size, and how you plan to use it. Budget-friendly kits are good for casual riders. High-end options offer better performance for serious cyclists.
Quality is important in a pedal assist kit. Choose well-known brands with strong warranties and good reviews. The right kit can make your bike powerful and fun to ride, giving you more freedom and excitement.
Choosing the Right Motor: Hub vs Mid-Drive Systems
Choosing the right motor is key when turning your bike into an e-bike. Knowing the difference between hub and mid-drive motors is important. Each has its own benefits for your ebike kit, affecting your ride.

Electric bike motors are mainly hub or mid-drive. Each type affects how your bike performs, how efficient it is, and how it feels to ride.
Hub Motor Benefits and Limitations
- Simple installation process
- Lower initial cost
- Minimal maintenance requirements
- Quieter operation
Hub motors sit in the wheel’s center, giving direct power. They’re great for easy lithium battery bike conversions without big changes.
Mid-Drive Performance Features
- Better weight distribution
- Enhanced climbing capabilities
- More efficient power transfer
- Improved handling characteristics
Mid-drive motors are at the bike’s bottom bracket. They offer better performance for tough terrains and demanding rides.
Power Output Considerations
| Motor Type | Power Range | Best Use |
|---|---|---|
| Hub Motor | 250-750 watts | Urban commuting, flat terrain |
| Mid-Drive Motor | 350-1000 watts | Mountain biking, steep terrain |
When picking your ebike kit, think about where you ride, your fitness, and what you want from your ride. The right motor can make a big difference, giving you the power and efficiency you need.
Battery Selection and Mounting Solutions
Choosing the right battery is key when setting up an ebike mid-drive kit. The battery is the heart of your electric bike, affecting range, performance, and ride quality. It’s important to pick a battery that matches your ebike conversion needs.
When picking a battery, consider these factors:
- Voltage needs (36V, 48V, 52V)
- Capacity in ampere-hours (Ah)
- Battery type (lithium-ion, lithium polymer)
- Weight and size
Mounting the battery is also crucial. Different bike frames need different battery mounting methods. Here are some options:
- Frame-mounted batteries
- Rear rack battery setups
- Downtube integrated designs
- Custom frame adaptations
| Battery Type | Voltage | Capacity | Weight |
|---|---|---|---|
| Lithium-Ion | 36V | 10-13 Ah | 4-6 lbs |
| Lithium Polymer | 48V | 14-17 Ah | 5-7 lbs |
| High-Performance | 52V | 18-20 Ah | 6-8 lbs |
Choosing the right battery ensures your ebike rides smoothly. Look for batteries that balance weight and performance. Always check for safety and long-term reliability when picking a battery for your electric bike.
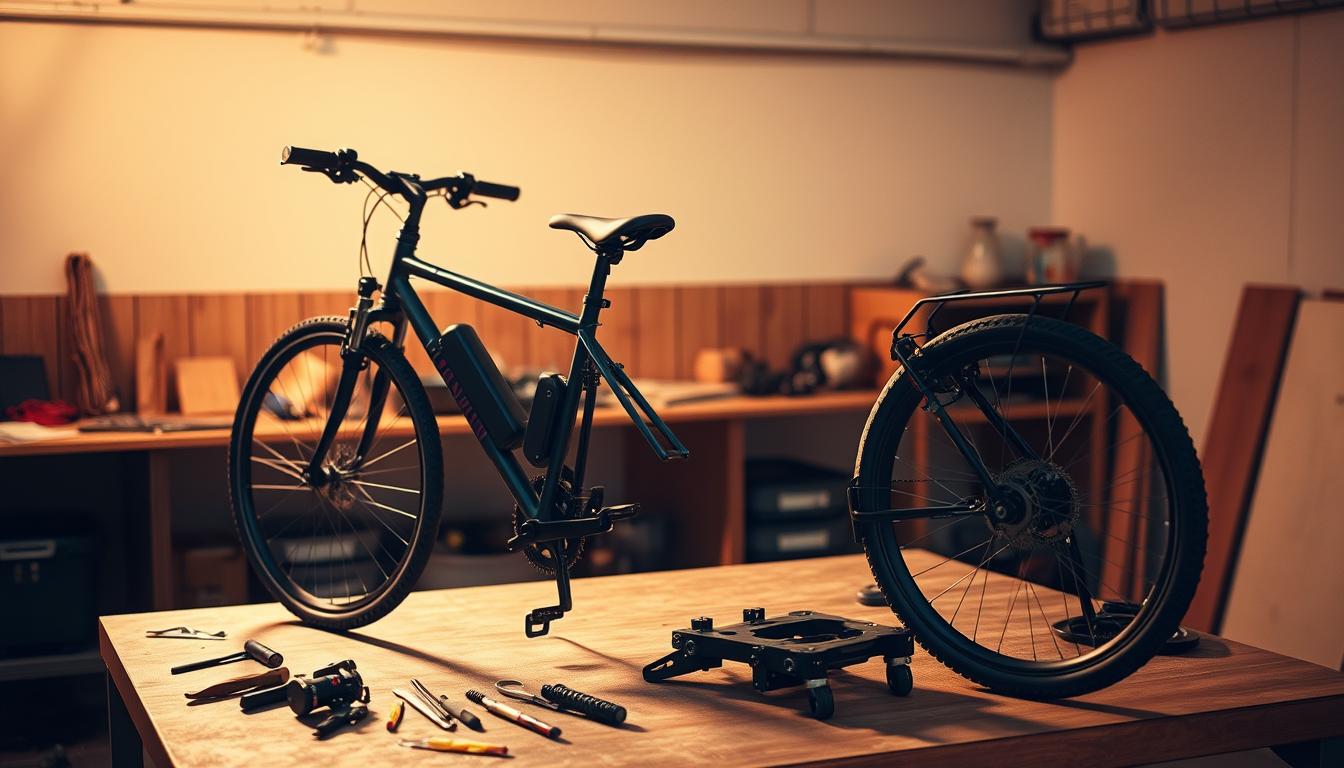
Installation Steps: Motor and Controller Setup
Turning your bike into an e-bike with a DIY kit needs careful steps. This guide will help you install your electric bike kit right. It ensures a safe and smooth conversion.

Essential Tools and Safety Equipment
First, get the right tools and safety gear:
- Adjustable wrench set
- Wire cutters and strippers
- Multimeter
- Electrical tape
- Safety glasses
- Work gloves
- Torque wrench
Wiring and Connection Process
Good wiring is key for a successful e-bike conversion. Here are the main steps:
- Remove the bike’s original wheel
- Mount the electric motor carefully
- Connect battery terminals securely
- Attach controller to frame
- Route wiring carefully to avoid interference
| Connection Type | Recommended Action | Safety Note |
|---|---|---|
| Battery to Controller | Use waterproof connectors | Check polarity before connecting |
| Motor Phases | Ensure clean, tight connections | Use heat-shrink tubing |
| Throttle/Pedal Assist | Secure with zip ties | Verify smooth movement |
Testing and Troubleshooting
After installing, do a full system check. Start with a low-power test ride. Listen for odd sounds and check electrical connections.
Make sure battery voltage and motor response are good. This ensures the system works well before you ride it fully.
Optimizing Your Converted E-bike’s Performance
To get the most out of your ebike conversion, focus on fine-tuning and detail. Owners of battery powered bike kits can boost their ride by learning key optimization tips. These tips improve both the riding experience and efficiency.
First, calibrate your electric bike’s pedal assist system. This step is key for smooth power and better battery use. Try out different assist levels to find the sweet spot for power and range.
- Check motor alignment and tension regularly
- Monitor battery temperature during rides
- Adjust pedal assist sensitivity
- Verify controller settings for maximum efficiency
Battery care is vital for your ebike’s performance. Keep it charged between 20-80% to extend its life and power. Also, store it in a cool, dry place when not riding.
Regular maintenance boosts your e-bike’s performance. Lubricate parts, check electricals, and check tire pressure for smooth rides. Keeping up with tune-ups will maximize your battery powered bike kit’s potential.
- Clean electrical contacts quarterly
- Inspect wiring for wear and tear
- Update firmware if available
- Conduct periodic system diagnostics
With these optimization tips, you can turn a regular bike into a powerful electric vehicle. Enjoy better range, power, and reliability on your rides.
Cost Analysis: Kit Options and Budget Planning
Turning your bike into an electric one with a kit is exciting and budget-friendly. Knowing the costs of a pedal assist kit helps you choose wisely for your e-bike project.
Choosing an electric bike motor kit needs careful budget planning. Prices vary a lot based on the kit’s quality and features.
Entry-Level vs Premium Components
When picking a pedal assist kit, you’ll see different prices:
- Entry-level kits: $200-$500
- Basic performance
- Limited battery range
- Good for casual riders
- Premium kits: $500-$1,500
- Advanced motor tech
- Longer battery life
- Better performance
Long-term Maintenance Costs
Think about the ongoing costs of your electric bike kit. This includes battery replacement and repairs. Better quality parts usually need less upkeep, saving you money over time.
Return on Investment
A good pedal assist kit can save you money on transport. It cuts down on car use and offers a green way for short to medium trips. Your e-bike can eventually pay for itself.
Look at your budget, riding habits, and future plans. This will help you pick the best electric bike motor kit for your bike.
Legal Requirements and Safety Considerations
Before you start your ebike conversion, it’s key to know the local laws. Each state and city has its own rules about electric bikes. These include what kind of bike you can have, how much power it can have, and where you can ride it. Make sure to check your local transportation rules to follow the law.
Your safety is the most important thing when converting your bike. Wear a helmet, clothes that reflect light, and gloves that protect your hands. Your e-bike must also meet safety standards like working brakes and lights for night riding. Always check your bike before you ride.
Every area has its own rules about how much power your e-bike can have. Most places say it can’t be more than 750 watts and can’t go faster than 20 miles per hour. Make sure your bike follows these rules to stay out of trouble. You might need to register your e-bike with local authorities.
When you ride your e-bike, act like you’re driving a car. Signal your turns, follow traffic lights, and watch out for other cars. By following the rules and being careful, you’ll have a fun and safe ride on your e-bike.